


LLMに知識を与える手法として、検索システムを使用したRAG(Retrieval-Augmented Generation)が主流になっています。
Azureにおいては、1つの方法として、Azure OpenAI ServiceのLLMとAzure AI Searchの検索システムを利用してRAGを実装することが可能です。
本記事では、RAGの実装の基盤となる、Azure AI Searchのインデックス作成の方法をまとめます。
インデックス
詳しくは、Micorosoft社のドキュメントをご覧いただければと思いますが、リンク先から引用しながら、インデックスについて簡単にまとめてみます。
Azure AI Searchの「検索インデックス」は、検索可能なコンテンツを指します。これは、検索エンジンでインデックス作成、全文検索、ベクトル検索、ハイブリッド検索、フィルターされたクエリに使用できます。
インデックスは、スキーマによって定義され、検索サービスに保存されます。このスキーマは、検索ドキュメントが格納されるインデックスの構造を決定します。
概念的には、ドキュメントはインデックス内で検索可能なデータの1つの単位です。例えば、小売業者には製品ごとのドキュメントがあり、ニュース組織には記事ごとのドキュメントがある場合、旅行サイトにはホテルと目的地ごとのドキュメントがある場合があります。
インデックスには、ベクトル検索のためのベクトル化されたドキュメントを格納することができます。
また、文書が長い場合、分割してドキュメントとして格納することもできます。
検索サービスの作成
まず、Azure AI Searchで検索サービスを作成することから始まります。
本記事では例として、商品についてのドキュメントを格納するインデックスを作成してみます。
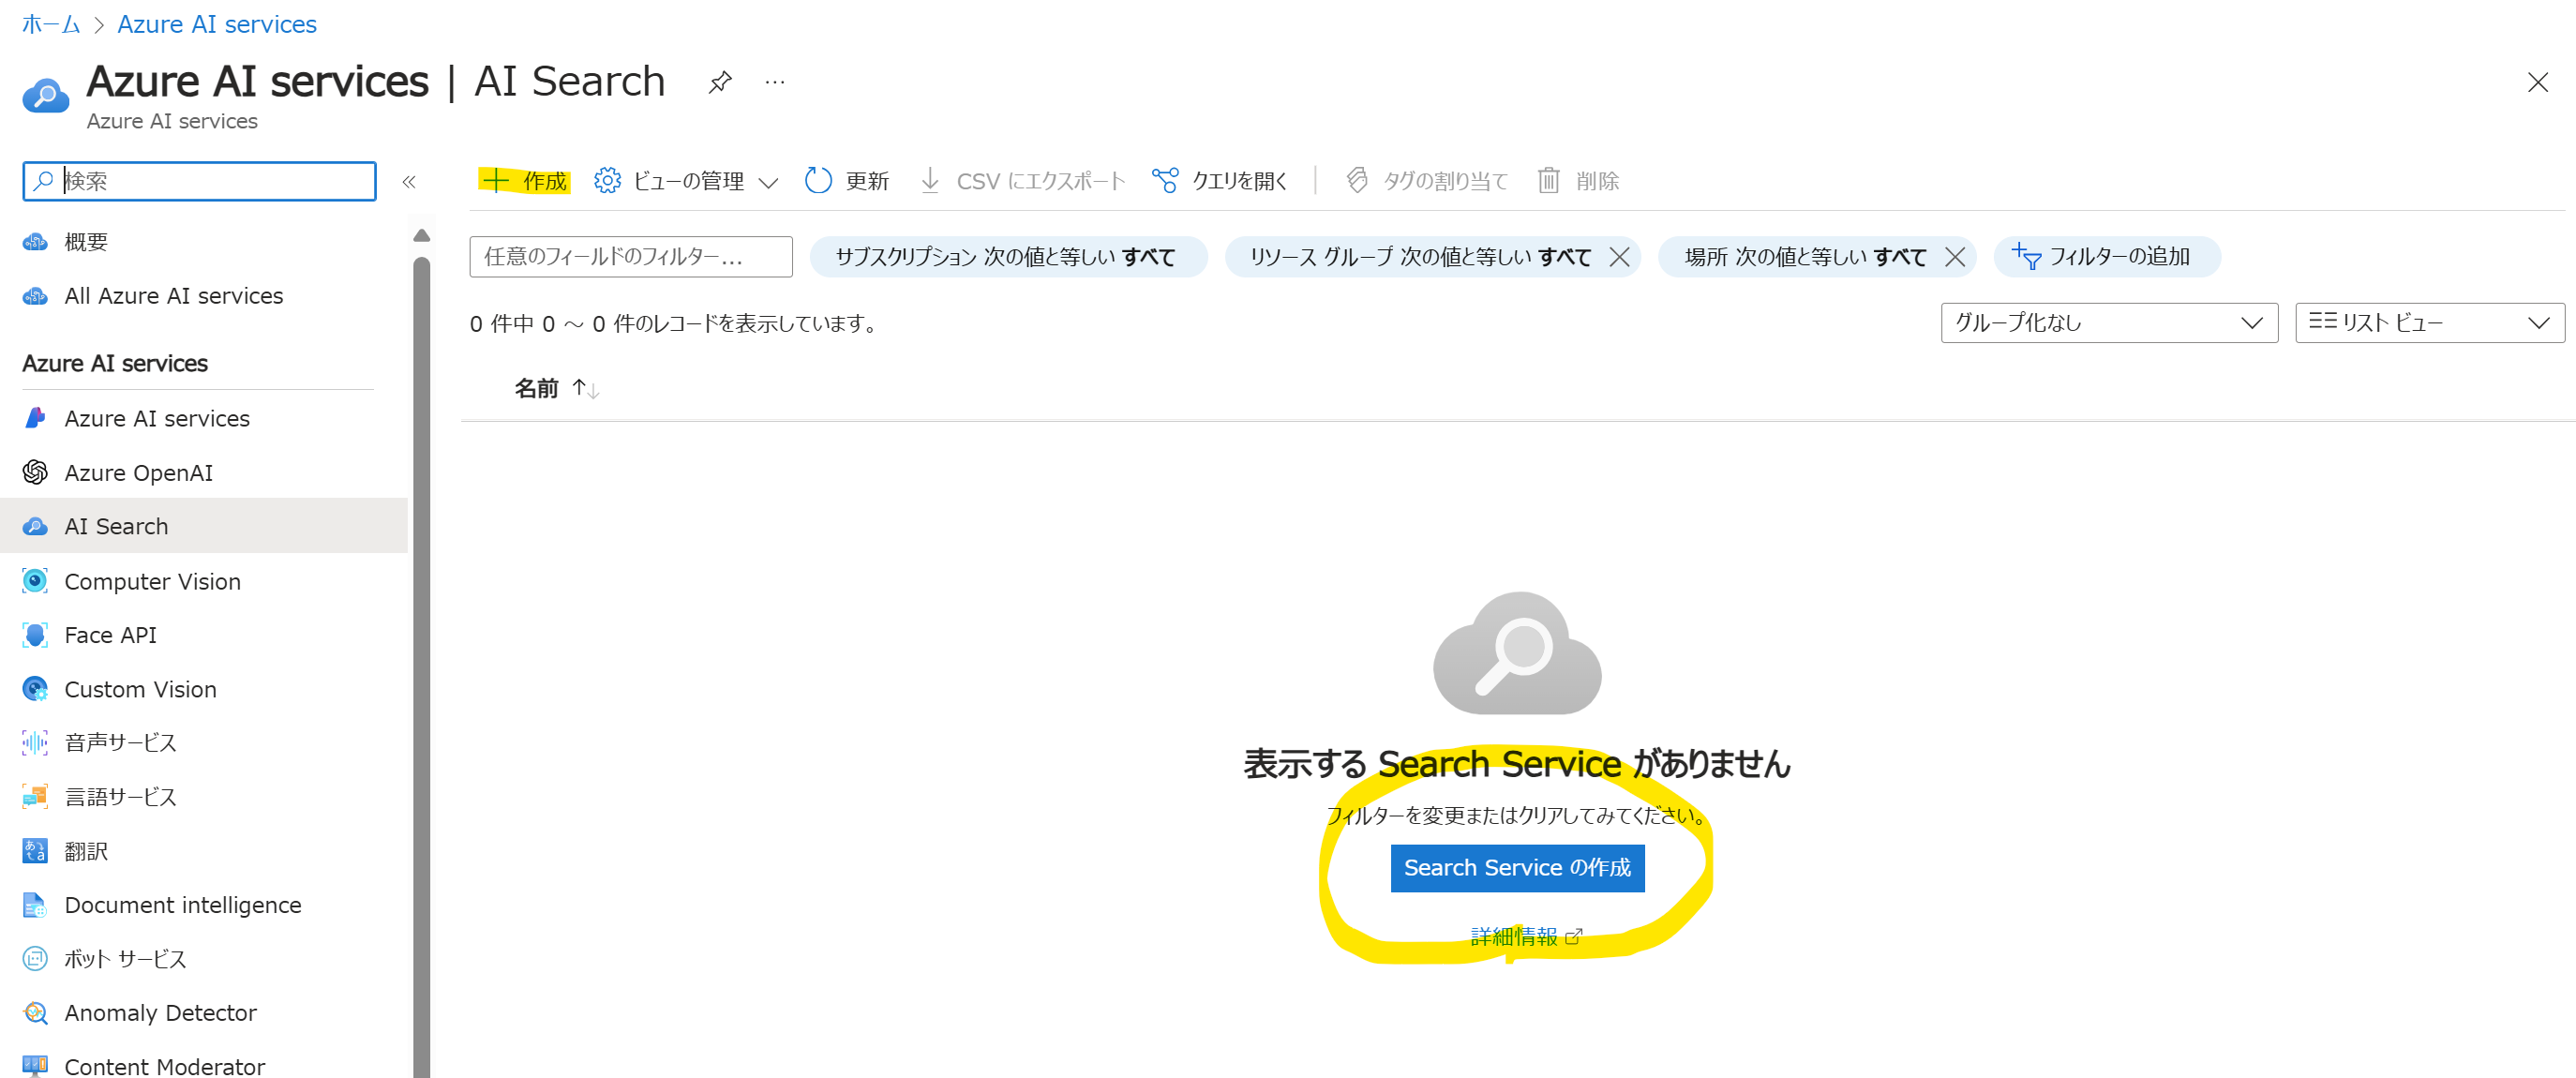
Azureポータルから、検索ウィンドウで検索するなどして、AI Searchを開きます。
左上あたりの「作成」もしくは中央の「Search Serviceの作成」をクリックします。
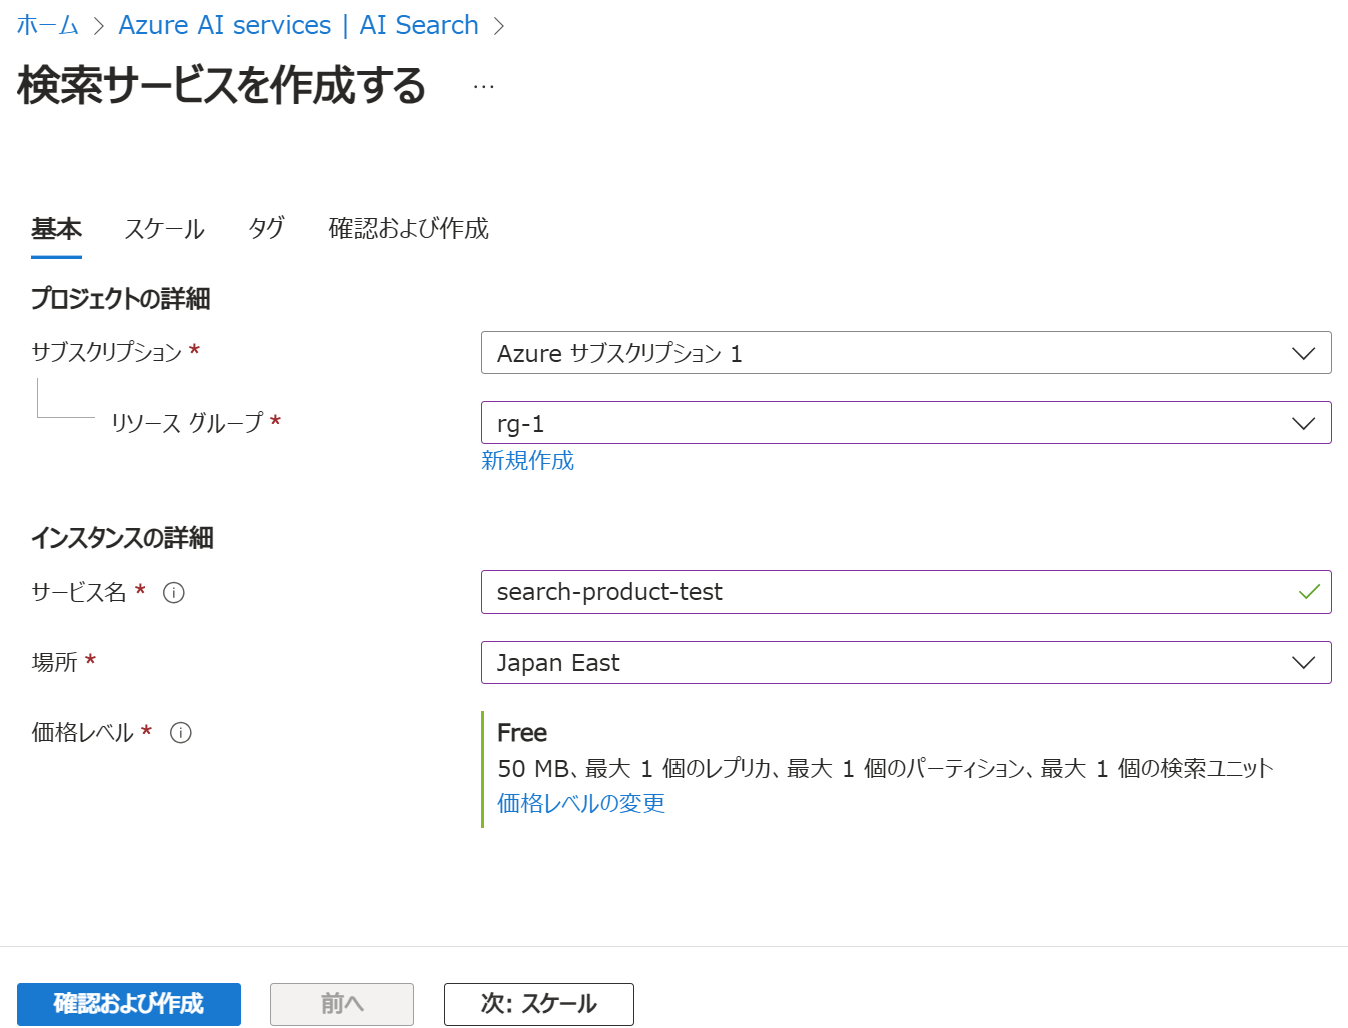
以下のとおり設定して、「確認および作成」をクリックします。
サブスクリプション、リソースグループはアカウントにあわせて設定し、サービス名と場所を今回のシステムに適した名称・設定にします。価格レベルは、Free(無料)で作成します。
検証が完了したら「作成」ボタンをクリックします。
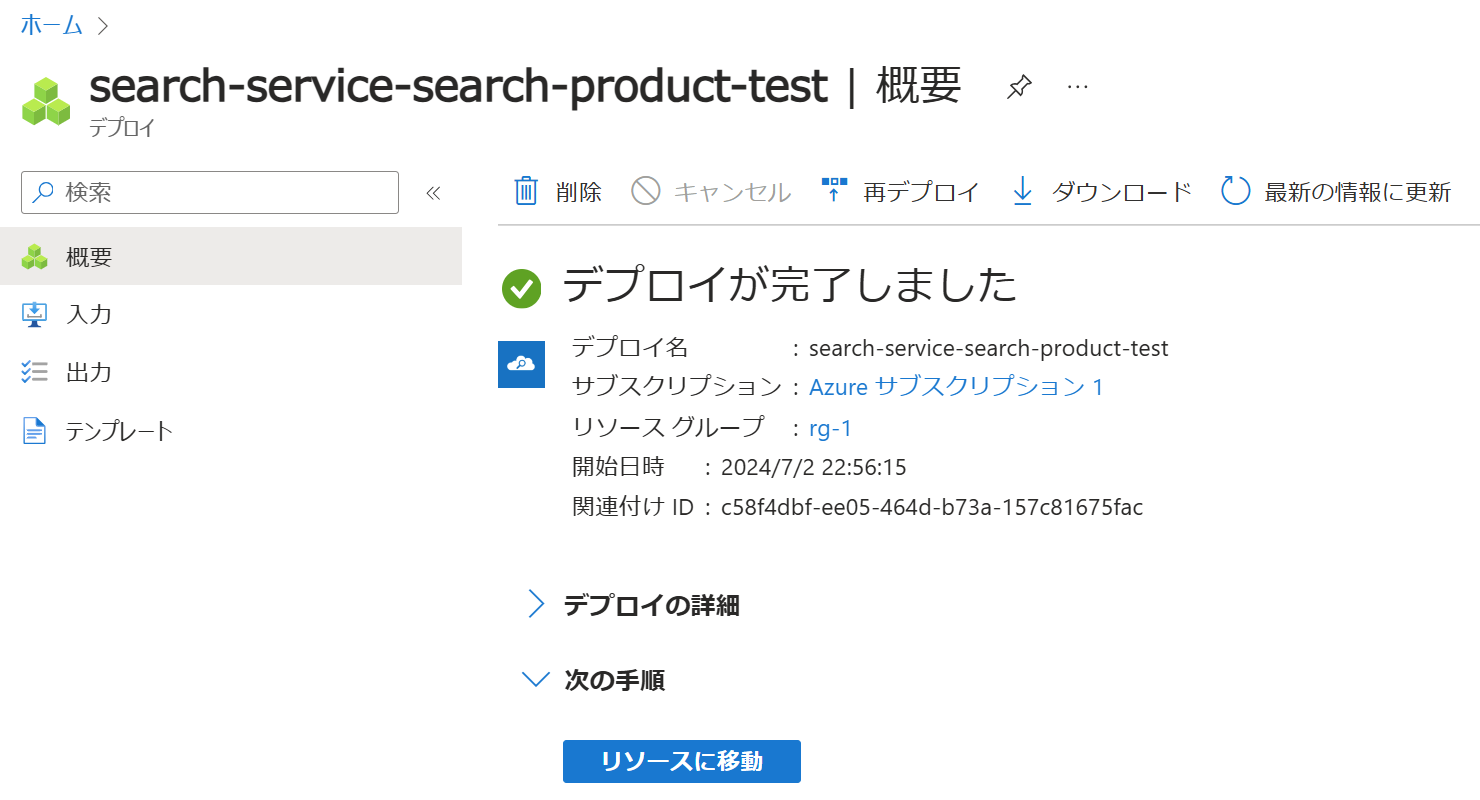
作成が完了すると以下のようにメッセージが表示されます。
Pythonを用いたインデックス作成
アクセス情報の確認
ローカルのPythonプログラムから検索サービスにアクセスするためのエンドポイントとアクセスキーを確認します。
エンドポイントとアクセスキーは、サンプルコードで使用します。
エンドポイント
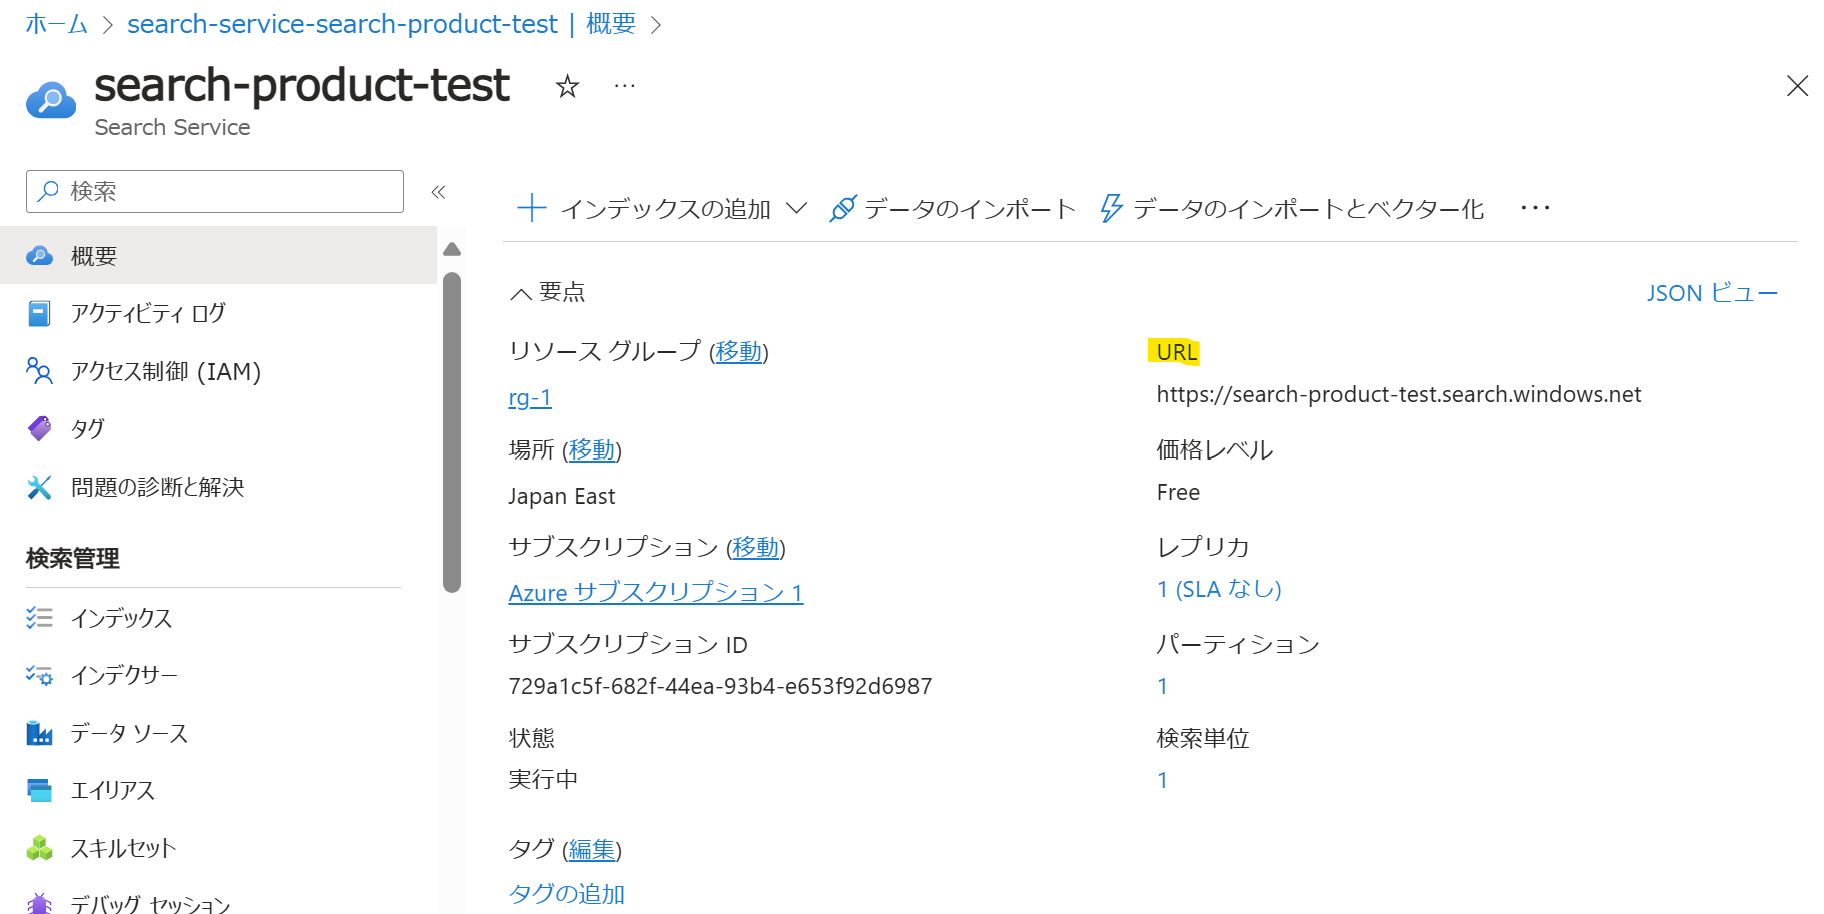
デプロイ完了画面の「リソースに移動」をクリックすると、以下のような表示になります。AI Searchのトップ画面の一覧から作成した検索サービスを選択することも可能です。
メニューの「概要」をクリックすると、エンドポイントURLが表示されます。
アクセスキー
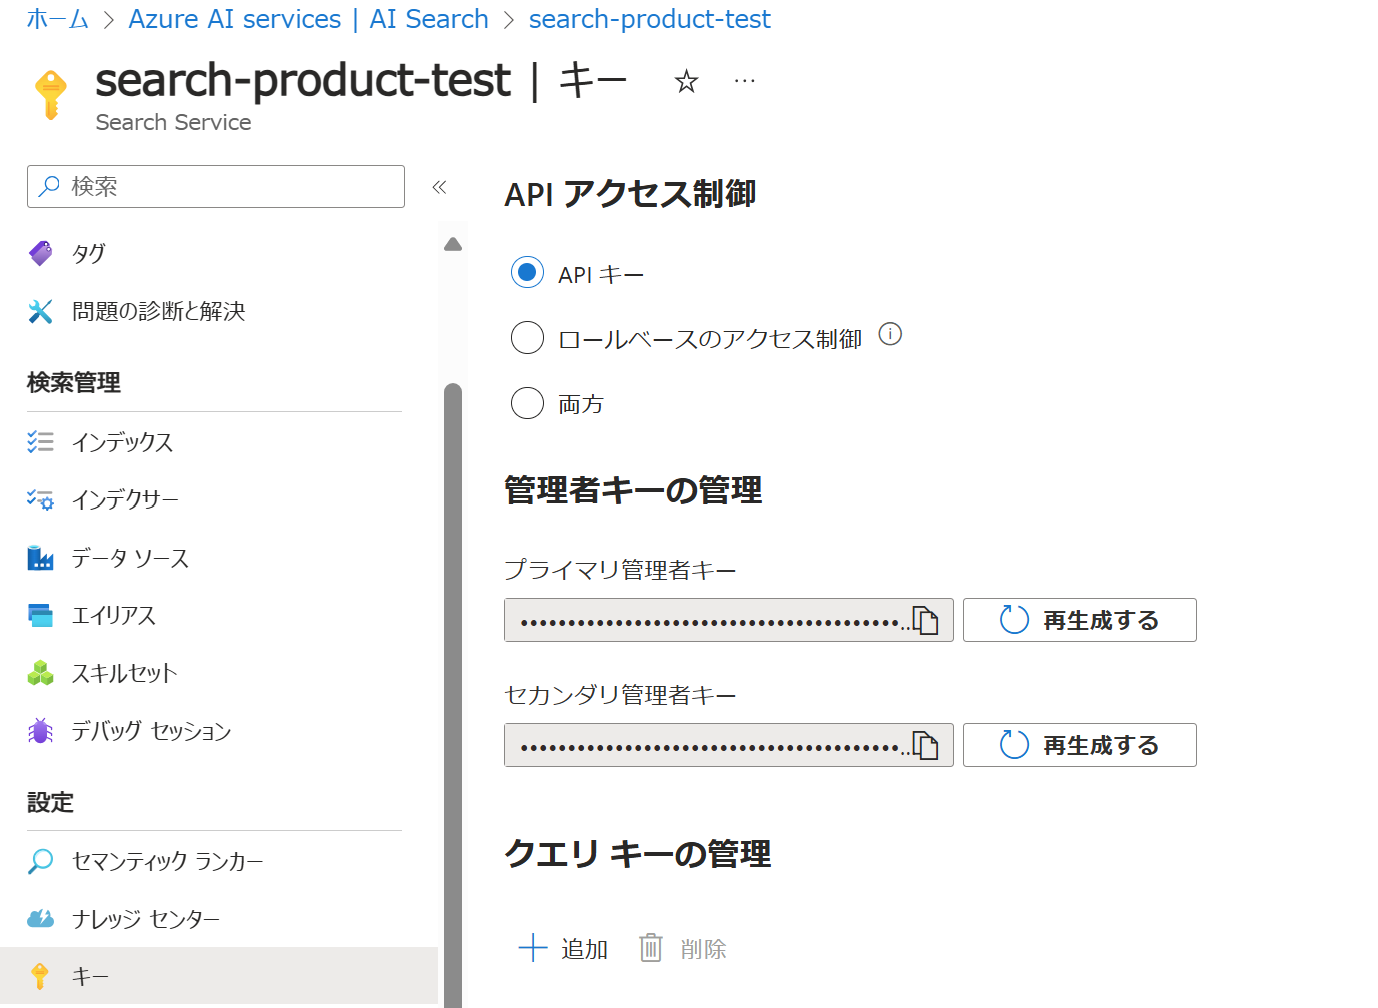
メニューの「キー」をクリックすると、APIキーが表示されます。プライマリ管理者キーでアクセス可能です。
Pythonによるインデックス作成
必要なライブラリをインストールします。
pip install python-dotenv
pip install azure-search-documents==11.4.0b8
インデックス作成を行うPythonのサンプルコードです。
import os
from dotenv import load_dotenv
from azure.core.credentials import AzureKeyCredential
from azure.search.documents.indexes import SearchIndexClient
from azure.search.documents.indexes.models import (
    CorsOptions,
    SearchIndex,
    SearchField,
    SearchFieldDataType,
    SimpleField,
    SearchableField,
    VectorSearch,
    SemanticConfiguration,
    SemanticField,
    PrioritizedFields,
    SemanticSettings,
    HnswVectorSearchAlgorithmConfiguration,
    HnswParameters
)

load_dotenv()

# AI Search Endpoint & Key
endpoint = os.getenv('AI_SEARCH_ENDPOINT')
key = os.getenv('AI_SEARCH_KEY')

# AI Search Client
client = SearchIndexClient(endpoint, AzureKeyCredential(key))

name = "index-product"

fields = [
    SimpleField(
        name="id",
        type=SearchFieldDataType.String,
        key=True
    ),
    SimpleField(
        name="price",
        type=SearchFieldDataType.Double,
        filterable=True,
    ),
    SearchableField(
        name="description",
        type=SearchFieldDataType.String,
        searchable=True,
        filterable=True,
        analyzer_name='ja.microsoft',
    ),
    SearchField(
        name="description_vector",
        type=SearchFieldDataType.Collection(SearchFieldDataType.Single),
        searchable=True,
        vector_search_dimensions=1536,
        vector_search_configuration='vectorConfig',
    ),
]

vector_search = VectorSearch(
    algorithm_configurations=[
        HnswVectorSearchAlgorithmConfiguration(
            name="vectorConfig",
            kind="hnsw",
            parameters={
                "m": 4,
                "efConstruction": 500,
                "efSearch": 600,
                "metric": "cosine"
            }
        )
    ]
)

semantic_config = SemanticConfiguration(
    name="semantic-config",
    prioritized_fields=PrioritizedFields(
        prioritized_content_fields=[SemanticField(field_name="description")]
    )
)

semantic_settings = SemanticSettings(configurations=[semantic_config])
cors_options = CorsOptions(allowed_origins=["*"], max_age_in_seconds=60)
scoring_profiles = []

index = SearchIndex(
    name=name,
    fields=fields,
    semantic_settings=semantic_settings,
    scoring_profiles=scoring_profiles,
    vector_search=vector_search,
    cors_options=cors_options
)

result = client.create_index(index)

print(result)
コード解説
インポート
import os
from dotenv import load_dotenv
from azure.core.credentials import AzureKeyCredential
from azure.search.documents.indexes import SearchIndexClient
from azure.search.documents.indexes.models import (
    CorsOptions,
    SearchIndex,
    SearchField,
    SearchFieldDataType,
    SimpleField,
    SearchableField,
    VectorSearch,
    SemanticConfiguration,
    SemanticField,
    PrioritizedFields,
    SemanticSettings,
    HnswVectorSearchAlgorithmConfiguration,
    HnswParameters
)
必要なライブラリやモジュールをインポートしています。
dotenvは環境変数の読み込み、azure.search.documents.indexes関連のインポートは、Azure AI Searchのインデックス作成に必要です。
環境変数の読み込み
load_dotenv(override=True).envファイルから環境変数を読み込みます。
endpoint = os.getenv('AI_SEARCH_ENDPOINT')
key = os.getenv('AI_SEARCH_KEY').envファイルには、Azure Portalで確認したエンドポイントとアクセスキーをそれぞれ設定しておきます。
# .env
AI_SEARCH_ENDPOINT=https://search-product-test.search.windows.net
AI_SEARCH_KEY=***********************************
インデックス名の設定
name = "index-product"Azure Search クライアントの設定
client = SearchIndexClient(endpoint, AzureKeyCredential(key))環境変数に設定しているAzure Searchのエンドポイントとアクセスキーを取得し、SearchIndexClientを作成します。
インデックスフィールドの定義
fields = [
    SimpleField(
        name="id",
        type=SearchFieldDataType.String,
        key=True
    ),
    SimpleField(
        name="price",
        type=SearchFieldDataType.Double,
        filterable=True,
    ),
    SearchableField(
        name="description",
        type=SearchFieldDataType.String,
        analyzer_name='ja.microsoft',
        searchable=True,
        filterable=True,
    ),
    SearchField(
        name="description_vector",
        type=SearchFieldDataType.Collection(SearchFieldDataType.Single),
        searchable=True,
        vector_search_dimensions=1536,
        vector_search_configuration='vectorConfig',
    ),
]
インデックスに含まれるフィールドを定義します。
id: 主キーとなる文字列フィールド。
price: フィルタリング可能な数値フィールド。
description: 検索可能でフィルタリング可能なテキストフィールド(日本語解析を指定)。
description_vector: ベクター検索用のフィールド。
vector_search_dimensions=1536 は、ベクトルの次元数ですが、OpenAIのEmbeddingモデルで生成されるベクトルの次元数にあわせています。
ベクター検索の設定
vector_search = VectorSearch(
    algorithm_configurations=[
        HnswVectorSearchAlgorithmConfiguration(
            name="vectorConfig",
            kind="hnsw",
            parameters={
                "m": 4,
                "efConstruction": 500,
                "efSearch": 600,
                "metric": "cosine"
            }
        )
    ]
)
HNSWアルゴリズムを用いたベクター検索の設定を行います。
m
各ノードが持つ近傍ノードの数。値が大きいほど精度が高くなるが、メモリ消費が増える。efConstruction
インデックス作成時の探索深度。値が大きいほど精度が高くなるが、インデックス作成が遅くなる。efSearch
検索時の探索深度。値が大きいほど精度が高くなるが、検索が遅くなる。metric
距離計算の指標(ここでは”cosine”)。コサイン類似度を使用してベクトル間の距離を計算する。
HNSW(Hierarchical Navigable Small World)アルゴリズムは、近似最近傍探索を効率的に行うための手法です。階層構造の小世界性ネットワークを利用し、高次元データ内で高速かつ高精度に似たデータポイントを検索します。最上位のレベルから探索を開始し、徐々に下位レベルに降りることで目的のデータポイントに到達します。画像検索やレコメンデーションなど、多様な分野で応用されています。
セマンティック設定
semantic_config = SemanticConfiguration(
    name="semantic-config",
    prioritized_fields=PrioritizedFields(
        prioritized_content_fields=[SemanticField(field_name="description")]
    )
)

semantic_settings = SemanticSettings(configurations=[semantic_config])
セマンティック検索の設定を行います。
CORS設定
cors_options = CorsOptions(allowed_origins=["*"], max_age_in_seconds=60)CORS(Cross-Origin Resource Sharing)の設定を行います。
allowed_origins=["*"]は、任意のオリジンからのリクエストを許可することを示し、max_age_in_seconds=60は、ブラウザがこの設定をキャッシュする時間を60秒に設定します。これにより、異なるオリジンからのアクセスが可能となり、パフォーマンスが向上します。
CORSは、異なるオリジン間でリソースの共有を許可するためのセキュリティ機構です。Webブラウザは、ドメインが異なるサーバーへのリクエストを制限しますが、CORSはサーバーが適切なHTTPヘッダーを返すことで、特定のオリジンからのリクエストを許可します。これにより、異なるドメイン間で安全にデータをやり取りできます。
スコアリングプロファイルの設定
scoring_profiles = []インデックスの作成
index = SearchIndex(
    name=name,
    fields=fields,
    semantic_settings=semantic_settings,
    scoring_profiles=scoring_profiles,
    vector_search=vector_search,
    cors_options=cors_options
)

result = client.create_index(index)
上記で定義した設定を用いてインデックスを作成します。
実行結果
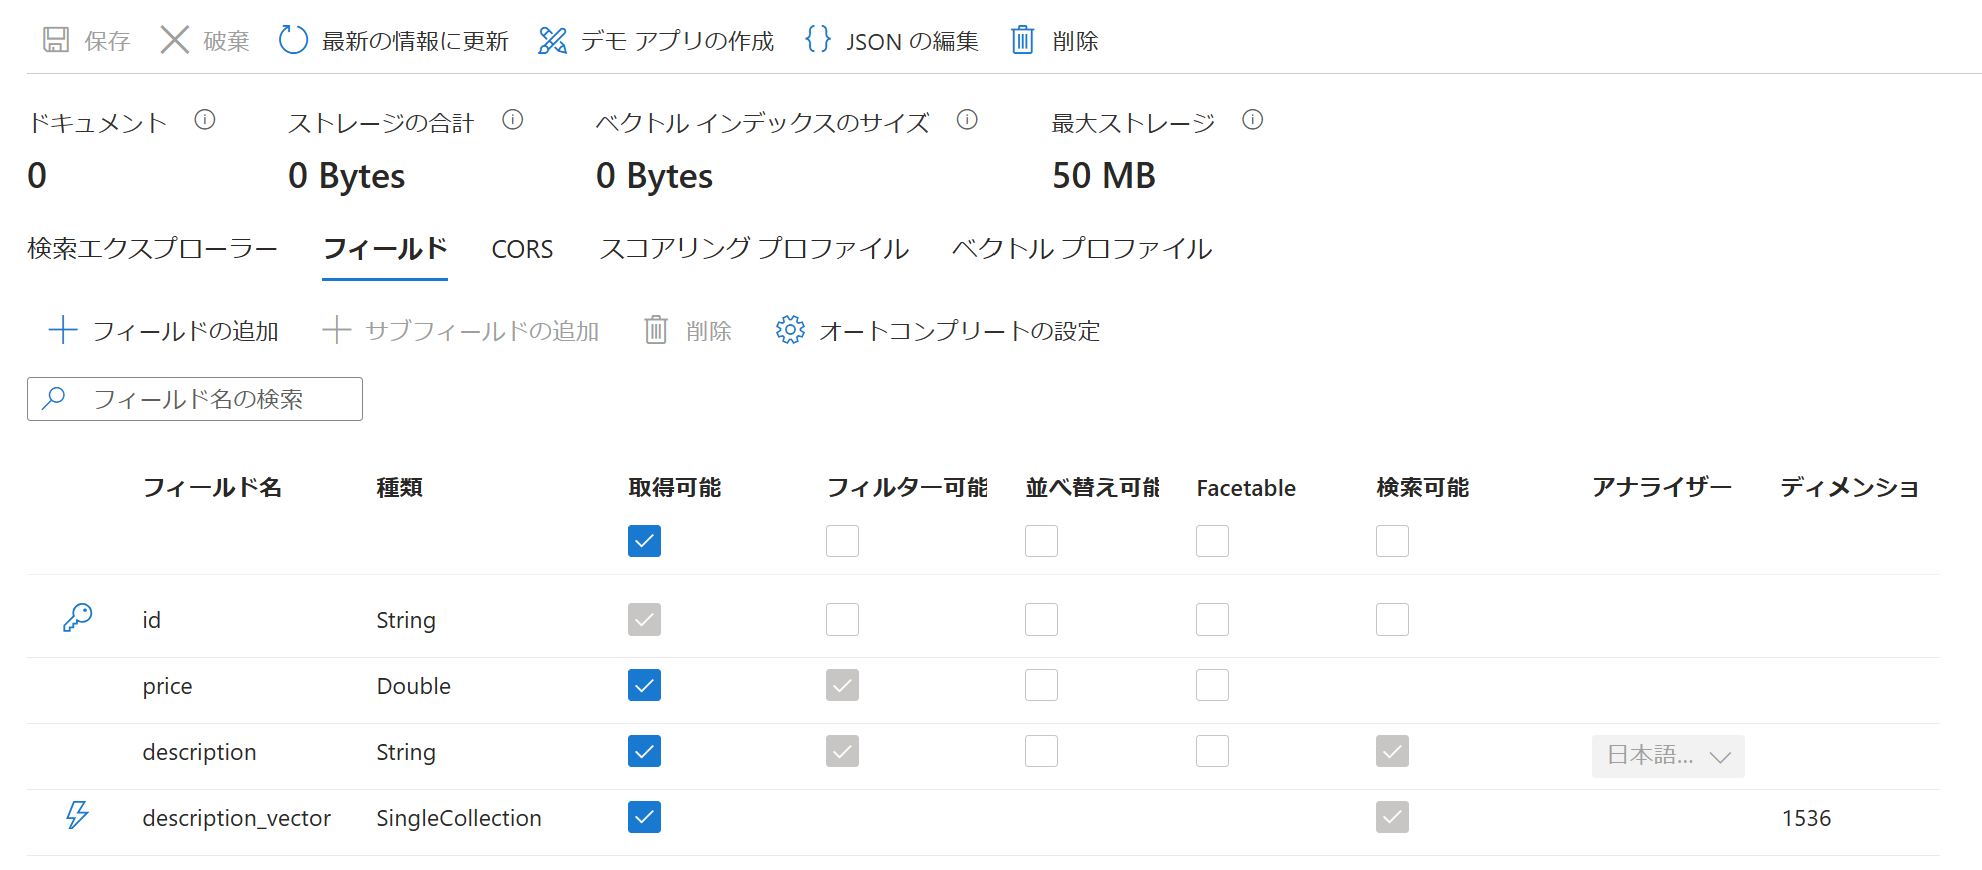
サンプルコードを実行すると、AI Searchのメニュー「インデックス」に作成したインデックスが表示されます。
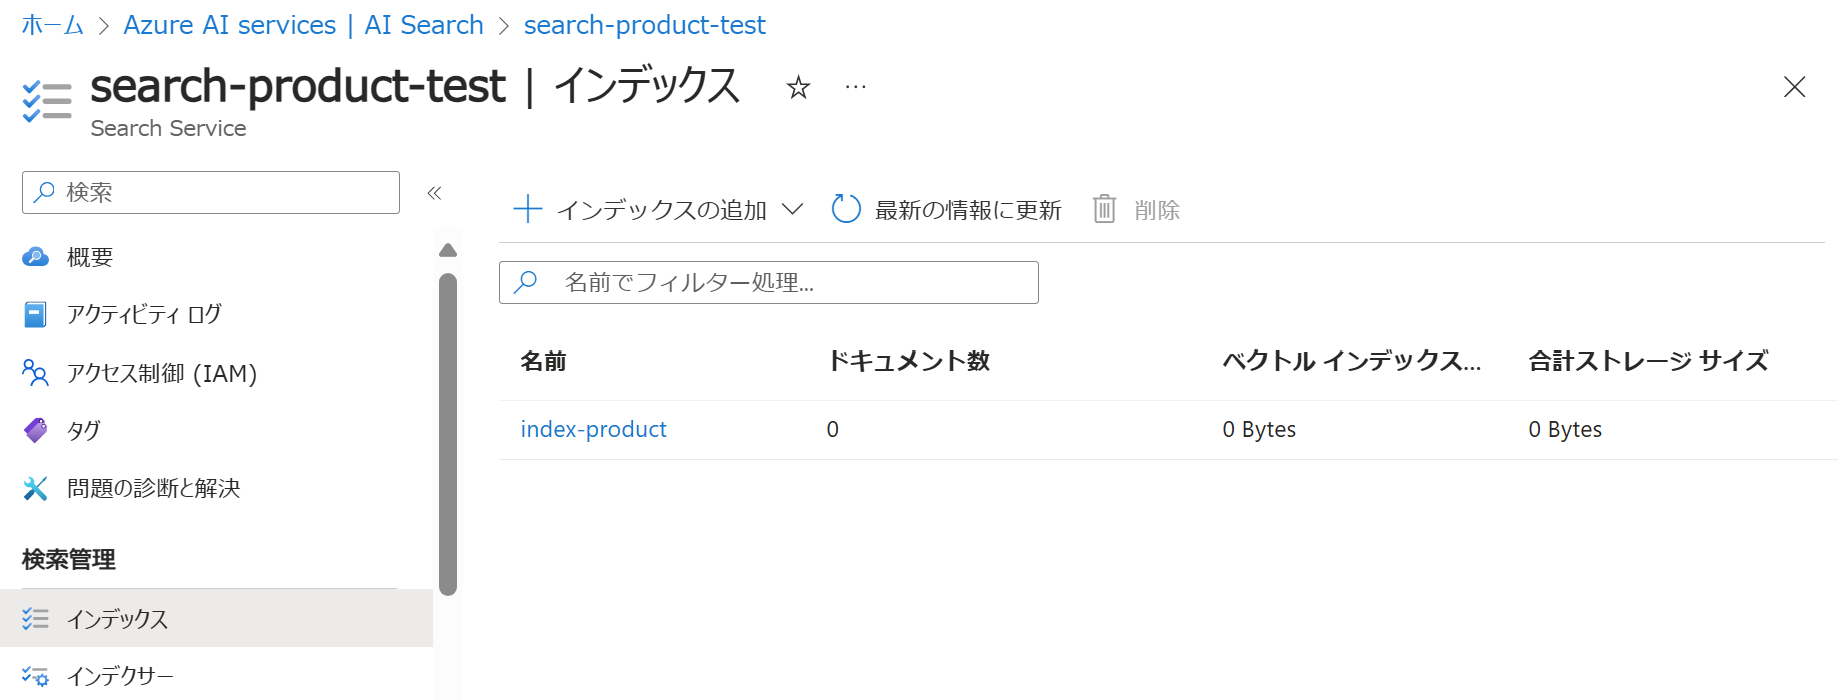
「index-product」をクリックして、「フィールド」をクリックすると設定したフィールド名が表示されていることが分かります。